Friday, December 19, 2008
Friday, November 28, 2008
Awesome High Fashion Photo Gallery FOTOLITIK
 An impressive photo-gallery. Stop and take a look. It will give you standards to strive for.
http://fotolitikstudio.com/splash.html
Monday, November 24, 2008
Fashion Photography - How to Do an Editorial Fashion Photography Spread

In this article London based Fashion Photographer Joaquim Barreto walks us through the process of how to do a fashion photography editorial spread for a magazine. He’s also shared a series of shots from a fashion editorial spread that he’s done (there is a description of the brief for this spread at the bottom of this post).
Saturday, November 15, 2008
Photo Lighting Diagram for Photoshop

Todd (TJ Asher) asked if I'd share my setup shapes. "But of course", I say :)Below is a link to a FREE lighting tool I created to share your lighting setups. See restrictions below.
Tuesday, November 4, 2008
Strobe Trigger Voltages
Is your old strobe safe to use on your new camera?Some strobes (and infrared strobe triggers) use high voltages in the trigger circuit. For mechanical cameras, this is fine — but many newer, electronically-driven cameras (especially electronic 35mm SLRs like the EOS or digicams — or for that matter, EOS digicams, like the 300D) can be damaged by excessive strobe voltages.
How much is too much? What voltage might my own strobe generate? This page tries to help answer those questions. It contains a table of strobe trigger voltages, a few measured by myself but most contributed by readers of this site. It also contains some information about specific camera makes and the strobes that light them.http://www.botzilla.com/photo/strobeVolts.html
How much is too much? What voltage might my own strobe generate? This page tries to help answer those questions. It contains a table of strobe trigger voltages, a few measured by myself but most contributed by readers of this site. It also contains some information about specific camera makes and the strobes that light them.http://www.botzilla.com/photo/strobeVolts.html
Friday, October 31, 2008
Excellent Photoshop Tutorials for Textures and Backgrounds
 Photoshop provides designers with unlimited options for creating unique and attractive backgrounds. One of the most popular approaches is to create some type of textured background, and fortunately there are a number of helpful tutorials to teach you all the tricks you need to know.
PhotoshopPoint is a tutorial-providing website with well-written, high-quality Photoshop tutorialsGrungy Metal Texture
http://www.photoshoppoint.com/textures/grungy-metal-texture/
Free Photoshop Brushes Website
 The Photoshop brushes website now offers fourty free sets of Free Photoshop Brushes for free download, more detailed information on the progress of the site can be found on the news page.
Thursday, October 30, 2008
PhotosHOP brushes and textures AND PLUGINS
Grunge, dirty, gritty, slimy, rusty, shattered, dripping, torn, worn, and whatever you think that you may frown upon in real life, is an awesome resource for creativity.An incredible amount of photo effects, text effects, brushes and textures are available for free access on the web.This list is a compilation of sixty grunge and distressed effects resources for Adobe Photoshop. Go and get your hands dirty with them!
PSDTUTS
PSDTUTSis a blog/Photoshop site made to house and showcase some of the best Photoshop tutorials around. We publish tutorials that not only produce great graphics and effects, but explain in a friendly, approachable manner.
Photoshop is a fantastically powerful program and there are a million ways to do anything, we hope that reading PSDTUTS will help our readers learn a few tricks, techniques and tips that they might not have seen before and help them maximize their creative potentialhttp://psdtuts.com/about/
Photoshop is a fantastically powerful program and there are a million ways to do anything, we hope that reading PSDTUTS will help our readers learn a few tricks, techniques and tips that they might not have seen before and help them maximize their creative potentialhttp://psdtuts.com/about/
Tuesday, October 28, 2008
Learning the "FINE ART" OF PHOTOGRAPHY
The Photography-Now Art a Wonderful site devoted to fine art photographers. View the works of Ansel Adams and many more.http://photography-now.net/index.php
Monday, October 27, 2008
Lighting Ratios for Portrait Photography
An important concept to understand when dealing with studio lighting for portrait photography is contrast. Contrast is the difference in the amount of light that falls on the dark areas of a scene and the amount of light that falls on the highlight areas of a scene. Due to the latitude of film and digital sensors, it is the photographer’s goal to find the exposure that strikes the appropriate balance between the highlights and shadows. You must begin by deciding the desired “feel” of the final image. If you wish to obscure shadow detail and draw attention to the subject, high contrast lighting may be most appropriate. On the other hand, you may wish to show detail in both the highlight and shadow areas which would require lower contrast lighting. Once you know the effect you wish to obtain, you can begin to identify the proper lighting ratio for the shoot.
Ratio
Ratio
StopsDifference
Description
1:1
NoDifference
Flatlighting
2:1
1Stop
Generalcolor photography
3:1
11/2 Stops
Generalblack & white photography
4:1
2Stops
Dramaticlighting, low key
8:1
3Stops
Verydramatic, low key
Description
1:1
NoDifference
Flatlighting
2:1
1Stop
Generalcolor photography
3:1
11/2 Stops
Generalblack & white photography
4:1
2Stops
Dramaticlighting, low key
8:1
3Stops
Verydramatic, low key
Scott Vallance Video Tutorials
Photography Studio Equipment: Gels
Gels can add mood and drama to your photography lighting. Learn about gels in this free video on studio equipment for photography
http://www.ehow.com/video_2371506_photography-studio-equipment-gels.html
Photography Studio Equipment: Portrait Lighting Patterns
You can change the look of the subject and feel of the portrait tremendously with different portrait lighting patterns. Learn about portrait lighting patterns in this free video on studio equipment for photography
http://www.ehow.com/video_2371503_photography-studio-equipment-portrait-lighting.html
Photography Studio Equipment: Portrait Pre-test
When shooting portraits, do a pre-test before your subject arrives. Get your lighting set up based on an inexpensive wig head. Learn about portrait pre-test in this free video on studio equipment for photography.
http://www.ehow.com/video_2371502_photography-studio-equipment-portrait-pretest.html
Scott Vallance Tutorial
Photography Studio Equipment: Portrait Lighting Patterns
You can change the look of the subject and feel of the portrait tremendously with different portrait lighting patterns. Learn about portrait lighting patterns in this free video on studio equipment for photography.http://www.ehow.com/video_2371503_photography-studio-equipment-portrait-lighting.html
Photography Studio Equipment: Gels
Gels can add mood and drama to your photography lighting. Learn about gels in this free video on studio equipment for photography.http://www.ehow.com/video_2371506_photography-studio-equipment-gels.html
Photography Studio Equipment: Portrait Pre-test
When shooting portraits, do a pre-test before your subject arrives. Get your lighting set up based on an inexpensive wig head. Learn about portrait pre-test in this free video on studio equipment for photography.http://www.ehow.com/video_2371502_photography-studio-equipment-portrait-pretest.html
Vintage Lenses on Digital Cameras
VINTAGE SCREW MOUNT LENSES...WORTH THEIR WEIGHT IN GOLD...TOP QUALITY LIKE ZIESS, LEICA, TAKUMAR, PENTAX, AND HELIOS...BEST OF ALL THEY CAN BE DIRTY CHEAP
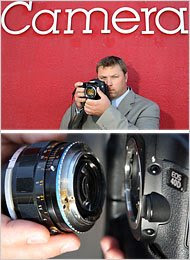 The hundreds of manual focus lenses adaptable for D.S.L.R.’s vary in price from the unlikely Sears-branded variations for under $10 to limited editions of the legendary Leica Noctilux that can cost more than $10,000.
The hundreds of manual focus lenses adaptable for D.S.L.R.’s vary in price from the unlikely Sears-branded variations for under $10 to limited editions of the legendary Leica Noctilux that can cost more than $10,000.For mechanical and optical reasons, some brands of D.S.L.R.’s work with a wider array of vintage lenses than others. Nikon D.S.L.R.’s can take scores of vintage Nikon lenses without adapters. But the Nikon cameras don’t work well, if at all, with the majority of vintage lenses from makers like Olympus, Pentax and Zeiss.
Canon cameras have the opposite characteristic. They are incompatible with most vintage Canon lenses, but with cheap adapters can mount dozens of brands of third-party vintage lenses.
Olympus D.S.L.R.’s can mount most of the same vintage lenses Canon cameras can, along with vintage Olympus lenses if you have the adapters
Pentax D.S.L.R.’s can mount just about every Pentax lens ever made and the third-party lenses that use the Pentax-style lens-mount. Sony D.S.L.R.’s are the least compatible of the major manufacturers. Those cameras work with certain Minolta lenses and, with an adapter, lenses that use what is known as an M42 screw mount.
As many of you know, the Pentax Screw Mount Lenses are superb lenses that cost relatively little. Some of the M42 Takumars are considered absolute "classics" and "gems" like the 50mm 1.4 SMC Takumar
read more here:
http://www.nytimes.com/2008/09/11/technology/personaltech/11basics.html?_r=1&pagewanted=2&oref=slogin
read more here:
http://www.nytimes.com/2008/09/11/technology/personaltech/11basics.html?_r=1&pagewanted=2&oref=slogin
Fashion Photography Blog
welcome you to the world of Melissa Rodwell, a Los Angeles fashion photographer with over 21 years experience and at least that many years left in her in image making. This blog is for all of you: amateur, student, professional, gossip monger, groupie, fashionista and just simply fan. Enjoy http://fashionphotographyblog.com
Saturday, October 18, 2008
Cactus Hack Installing a jack to the Reciever

The other day, the PC Synch cable which attaches the Cactus wireless flash trigger to my Canon 580EX flash broke. I’ve read on Strobist that PC Synch cable connectors are notoriously weak and unreliable. One clever member of the Strobist discussion group hacked their Cactus receiver to have an additional 3.5mm phono jack. So I decided to do the same!
Since hacking a 3.5mm phono jack to my 580EX, I’ve not needed to use the Cactus’ flimsy cold foot adapter, which I have since removed. That left me with the perfect location to put a 60 cent 3.5mm phono jack. I drilled out a slightly larger hole, pushing the drill bit to the side a bit to widen the hole in the direction away from the Cactus’ circuit board. I used a couple of layers of electrical tape to cover the contacts on the board near the hole to prevent accidental short circuit.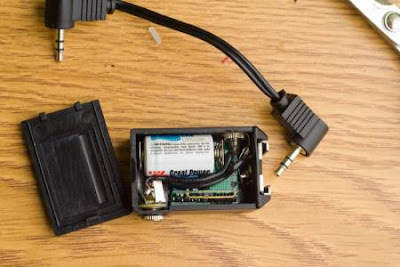
Since hacking a 3.5mm phono jack to my 580EX, I’ve not needed to use the Cactus’ flimsy cold foot adapter, which I have since removed. That left me with the perfect location to put a 60 cent 3.5mm phono jack. I drilled out a slightly larger hole, pushing the drill bit to the side a bit to widen the hole in the direction away from the Cactus’ circuit board. I used a couple of layers of electrical tape to cover the contacts on the board near the hole to prevent accidental short circuit.
How to hook up a power jack

What is a power jack and why would you want one? A good question. Simply put, the power jack replaces both the switch and the receiver battery charge jack in your airplane. No more having to deal with connecting and disconnecting wires sticking out of your plane in order to charge the internal battery. No more replacing the super cheap switches most RC radio sets provide.

The power jack is very unobtrusive (see Figure #1below). The power jack has a plug in place when you want to leave the power disconnected, or you want to charge the internal battery of your plane. When you remove the plug, you battery supplies power to your receiver. Very simple.
Some care is needed. This is a popular thing modelers do, but they often do it with substandard jacks. Sometimes even using stereo jacks. Stereo Jacks are not designed to deliver DC power ! If you are listening to your stereo and the jack fails, all you get is some crackle. If it fails in your plane, the result can be a disaster.
You must use high quality DC coaxial jacks designed for this purpose. I use and recommend the Switchcraft 712A power jack used with the Switchcraft 760 power plug. Both are available at many electronic supply houses, or online at http://www.mouser.com/
Currently I am using Hitec radios only, this works fine for those. Any others brands, try at your own risk. As with anything else, this requires care, and I cannot personally guarantee results. It does work consistently for me; I have them in every new plane I build.
Vivitar flash hacked with phono port - P365 Oct19

I’ve had enough of the unreliability of the proprietary cable plug on my Vivitar 285HV flash. I’ve been putting off modifying it with a phono port like I did with my 580EX, but with the help of the Strobist discussion group, I found a reference with instructions how to do it, so I did it!And here’s the thing assembled with my modified Cactus wireless remote attached.
It works like a charm now. Completely reliable so far. I only hope my dodgy welding job holds. I’m a little wary of the cable being outside the flash. One good tug and it could pull right out. There was no room to put a knot in the cable inside the hole. I’d epoxy the hole shut if I was sure I’d never need to take the cable out in the future should it need re-doing.
I’ll just have to be careful with it!
here is another link
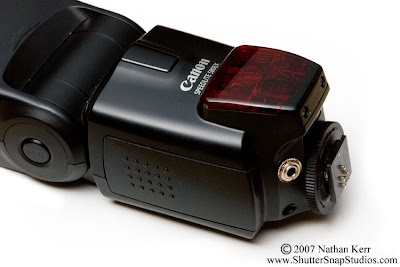
Adding A Mono Jack To The Vivitar 285HV http://www.shuttersnapstudios.com/Vivitar-285HV-article.html
Thursday, October 16, 2008
How to Position Lights for Photography
This site explains everthing from key light to filters and gels.
http://www.ehow.com/how_2301266_position-lights-photography.html
http://www.ehow.com/how_2301266_position-lights-photography.html
Tuesday, October 14, 2008
Ebay WIRELESS FLASH TRIGGERS Extreme Makeover

This tutorial will outline the process involved in modifying a set of Gadget Infinity Cactus V2s triggers (one transmitter and two receivers). So far I have made three modifications; an antenna matched at 433MHz for the transmitter, a lanyard for the receiver, and an external 2xAA battery pack for the receiver. The reason for doing this is to increase reliability and trigger distance, hopefully making them a much better option for the financially challenged folks out there (such as myself).
Friday, October 10, 2008
Home Depot Week: Fluorescent Lights and Accessories

This is another area I will be getting into when I have a little free time. Fluorescent fixtures are so cheap and so bright, you can use them as portrait light sources very easily.As you can see, there are lots of shapes and sizes. Normal people see kitchen fixtures. I see soft boxes, strip lights and ring lights.More on the lights and accessories after the jump.___________________________Okay, follow me for a sec. Say you have one dinky little flash. Why not consider two fluorescent strip lights for a high-glam foreground scheme and use the flash for the background light?Seriously, you could mount them vertically (one per light stand) or horizontally (one over your camera, one under, one stand supports the left side of each fixture, one supports the right.) You'd get some very cool clamshell and/or dual sidelight schemes for under $100.Better yet, throw up a strip light as a side/rim light on each side and umbrella the front to channel your frugal inner Greenberg. (If you want to make the subject cry, shoot another photog and tell him how little you paid for the lights...)

If you are a more MacGuyver-ish, you should be able to find a circular fixture that will work as a ringlight. You'll likely have to cut a hole in the center of the fixture after having relocated the ballast to somewhere off-board.And if you do this, please insulate the crap out of it. Be safe.(Some of those progressive Seattle types are already all over this one. Click on the pic for more info.)Remember, you'll want to green any flashes you use along with the fluorescents and set you camera to fluorescent white balance. For better color, check which bulbs match your camera's fluorescent white balance before purchasing by shooting the various bulb displays and seeing which looks the whitest.____________________________Moving down the aisle a little, we get to the cool, prismatic diffusers. How does $7 for a 2x4-foot sheet hit you? (Yeah, me, too.)
DIY Studio Lighting - The Strip Light That Won't Strip You Davide Greene - Fashion lighting on a budget
Use fluorescent strip lights for lighting Fashion. This is must watch video.http://www.youtube.com/watch?v=eik8iWX97pc&feature=related
http://www.diyphotography.net/the-strip-light-that-wont-strip-you
http://www.diyphotography.net/the-strip-light-that-wont-strip-you

Hyperfocal Distance is?

Do you know what Hyperfocal Distance is?Posted by: jeff in Landscapes
If you are shooting landscapes you probably should. Have you ever wondered where to focus on a landscape to render the greatest area of focus from near to infinity? If you know how to figure out your Hyperfocal Distance (HFD), you will knoSo what is HFD? It is the point of focus that will give you the greatest acceptable sharpness from a point near your camera on out to infinity. The near point is half the distance to your HFD. The wider your lens and the greater the aperture, the larger the area of acceptable sharpness.
Every lens has a distance that can be calculated depending on the length of the lens and the aperture you are using. You might have noticed this effect when using a very wide lens where almost everything looks sharp as opposed to a telephoto lens which has a much farther HFD. This is because your HFD on a wide angle lens is very close to you when shooting at high f-stops so you will have more area in focus. It sounds pretty complicated but it’s really not. For example, you walk into a nice mountain range with a field of wild flowers in the foreground and you would like to get everything in focus. If you set your lens to f/22 and just focus on the closest flowers, the chances are that you won’t be sharp to infinity, which is where your mountains are. This is because you depth of field is determined by your HFD. Let’s say that you know that with your 24mm lens, your HFD is 3 feet at f/22. By focusing at a subject that is 3 feet away, you will be sharp from 1.5 feet to infinity.w exactly where to focus your lens. http://www.revellphotography.com/blog/?p=726
Home Made Battery Packs
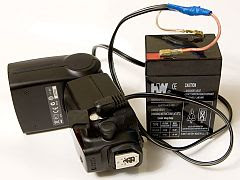
If you’ve been shooting with a flash for a while, I’m sure you had some battery problem or another at least once. Like when one of four batteries goes bad and quickly discharges the other three. Or when it’s cold and the batteries don’t hold their charge so well anymore. Wouldn't it be nice if you could have a more reliable source of power? One that virtually lasts for ever (well, not forever, but for a darn long time). This is probably on the wish list of anyone who is shooting off shoe and don't care much about weight, but do care about recycling time and number of pops that can be squeezed in a session.
Konstantin Sirotkin describes how to make a Flash mod that will allow you to connect your flash to an external power source.Yes this is an external power source, no mater how bomb-like it looks.
Four full alkaline batteries connected in series will give you about 6V total voltage. Four fully charged NiMH will net you about 5V. A fully charged sealed lead-acid battery (SLA) is about 7V and it eventually goes down to 5V as the battery discharges. As you see, a fully charged SLA is slightly above the rated voltage for the flash, but in practice I’ve never had a problem with that. I believe that the logical electronics in the flash works on 3V from a regulated supply (i.e. with a higher input it would just generate a bit more heat) and the step-up converter that produces high voltage doesn’t really care about its input as long as it’s DC and above 4V.
http://www.diyphotography.net/more-power-to-your-flash-external-sla-battery-flash-mod
Here's another example.

http://the-art-of-light.blogspot.com/2008/09/zewntrzne-zasilanie-flesza.htmlhe-art-of-light.blogspot.com/2008/09/zewntrzne-zasilanie-flesza.html
Wednesday, October 8, 2008
LIGHTING ESSENTIALS : For Photographers
We believe that lighting is the key. It is the basis for great photography. Learning to see light and create light is a joy, and photography is the medium of light.
This site is devoted to photography, and photographic lighting in specific. We want to feature items that photographers of all kinds will be interested in. Tutorials, online workshops, assignments, fun shoots, show-n-tell and more. We will present lighting information and lighting tools from DIY to the top-of-the-line Pro Gear. http://www.lighting-essentials.com/about-le/
 SEE A MODEL IN ACTION LEARN THESE POSES...
Welcome to Model Behavior with Briana. If you would like to ask any questions at all about modeling, working with models or what happens on the other side of the lens, go to the tags and click on Ask Briana. Here is this months column (October).
Let me introduce myself by saying that I have been modeling for over a year now and have been on dozens of photoshoots and movie sets. I work with Don at Lighting Essentials on workshops, DVD’s and tutorials. Working with so many models and photographers has given me some insights I would like to share with you all. While I am certainly not an expert, my work as a model in smaller markets may give you some insights as you work with models in your area. There are plenty of books by super-models, so think of this as a column by a young model starting out.
I will be posting columns at least a couple of times per month so come on back to see what is happening at Model Behavior.
Don and I will be doing some more things like this: Here we let it all hang out. No editing… this is what we did with a black dress and you see the good ones and the bad ones, but you also get to see how I approach the shot (with Don’s direction, of course…). You can see how I take a simple pose and try to get more out of it. Anyway, enjoy.http://www.lighting-essentials.com/model-behavior/
This site is devoted to photography, and photographic lighting in specific. We want to feature items that photographers of all kinds will be interested in. Tutorials, online workshops, assignments, fun shoots, show-n-tell and more. We will present lighting information and lighting tools from DIY to the top-of-the-line Pro Gear. http://www.lighting-essentials.com/about-le/
SEE A MODEL IN ACTION LEARN THESE POSES...Welcome to Model Behavior with Briana. If you would like to ask any questions at all about modeling, working with models or what happens on the other side of the lens, go to the tags and click on Ask Briana. Here is this months column (October).
Let me introduce myself by saying that I have been modeling for over a year now and have been on dozens of photoshoots and movie sets. I work with Don at Lighting Essentials on workshops, DVD’s and tutorials. Working with so many models and photographers has given me some insights I would like to share with you all. While I am certainly not an expert, my work as a model in smaller markets may give you some insights as you work with models in your area. There are plenty of books by super-models, so think of this as a column by a young model starting out.
I will be posting columns at least a couple of times per month so come on back to see what is happening at Model Behavior.
Don and I will be doing some more things like this: Here we let it all hang out. No editing… this is what we did with a black dress and you see the good ones and the bad ones, but you also get to see how I approach the shot (with Don’s direction, of course…). You can see how I take a simple pose and try to get more out of it. Anyway, enjoy.http://www.lighting-essentials.com/model-behavior/
Thursday, October 2, 2008

Monday, September 29, 2008
Shooting Headshots What You Need to Know

headshots 101 a site for actors
It is important to know about taking good headshots. Yet, there do not seem to be many resources for you, the artist, to be able to learn about these basic tools for taking better headshots. The whole purpose of your headshots is to get you the opportunities that will open the doors to auditions and work. Headshots are the primary tool for actors to promote themselves. Without a good set of headshots you will not be able to go very far.
http://www.headshots101.com/index.htm
Some things every model & actor should know about headshots
lhttp://www.zerotopia.com/resources/headshots/index.html
http://lecatr.people.wm.edu/headshots.html
Sunday, September 28, 2008
FREE FREE FREE Slide Show Software
Photostage Slideshow Software
Photo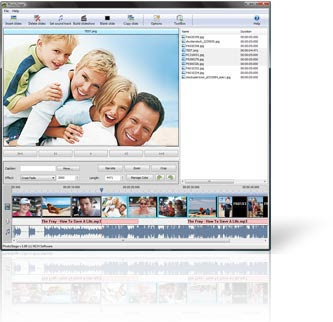 Slideshow Creator
Creating a slideshow from your digital photos has never been easier. Photostage brings your pictures, images and video to life and lets you share your favorite memories with family and friends in an interesting and portable way.
The brief was simple - make a slideshow creation program that is so easy to use your Grandma could do it. The result - Photostage.
PhotoStage is completely free.
Designed to be very easy and intuitive to use, Photostage will have you up and running within minutesFeatures
Stunning Transition Effects
Panning and zooming effects let you bring your photos to life.
Fade transition effect gives your slideshow that professional touch.
Preview the effects in real time.
Customize the duration of the effect.
http://www.nchsoftware.com/slideshow/index.html
Photo
Slideshow CreatorCreating a slideshow from your digital photos has never been easier. Photostage brings your pictures, images and video to life and lets you share your favorite memories with family and friends in an interesting and portable way.
The brief was simple - make a slideshow creation program that is so easy to use your Grandma could do it. The result - Photostage.
PhotoStage is completely free.
Designed to be very easy and intuitive to use, Photostage will have you up and running within minutesFeatures
Stunning Transition Effects
Panning and zooming effects let you bring your photos to life.
Fade transition effect gives your slideshow that professional touch.
Preview the effects in real time.
Customize the duration of the effect.
http://www.nchsoftware.com/slideshow/index.html
Monday, September 22, 2008
FLASH MODIFICATION - VIVITAR 2800
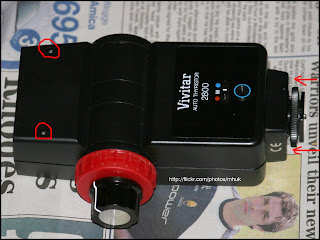
Add a power control knob to a manual thrysitor flash. The instructions here are for a vivitar flash but will work with any flash that has a auto thrysitor sensor like a sunpak or other. You can save a lot of money doing this way.
http://www.flickr.com/photos/mhuk/2554929724/
there is even a more advanced demo here.
http://www.flickr.com/groups/strobist/discuss/72157600789220443/
Vivid Light Photography

http://www.vividlight.com/articles/1615.htm
This website has a tremendous amount of resources starting with a great article on types of portrait lighting.
Sunday, September 21, 2008

Chris Warkocki - Photographer & Pentax K10D
A unique perspective when it comes to photography. Has a nice model gallery and shows you what the Pentax K10D can do.
http://www.p2foto.com/
http://www.p2foto.com/
INCREDIBLE HDR - OMAR JUNIOR
Omar Junior has one of the best photo galleries when it comes to HDR. His website also has tutorials and explains all the differences and nuances dealing with High Dynamic Range Photography.
This is a very interesting website for there is much to do and explore. The pictures themselves will amaze you. You can also check out his photostream on flickr.
http://www.flickr.com/photos/omarjunior/
This is a very interesting website for there is much to do and explore. The pictures themselves will amaze you. You can also check out his photostream on flickr.
http://www.flickr.com/photos/omarjunior/
Saturday, September 20, 2008
Awesome PodCasts and Photography Lessons
7 Photo Questions
See how easily you can take your photography to the next level by learning the digital photography tips, techniques and even secrets of world class photographers.
Whether you're interested in taking better nature photographs, the secrets to perfect exposure, how to earn money by selling your photos as stock photography, or how to take better pictures of your kids, you'll find valuable digital photography tips during our new weekly "7 Photo Questions" Podcast.
Hi, my name is Audri Lanford, and I'm passionate about digital photography. To help fire that passion within you, I'm interviewing many of the world's top photographers during my weekly podcast.
As your host and advocate, I interview a world class photographer and teacher to get answers to your biggest photography questions -- and it's all free. http://www.7photographyquestions.com/
BEST PHOTOSHOP TUTORIALS AND LESSONS
Photoshopmama, aka Mama Shan, is one of the best Photoshop teachers our there. Best of all most of her lessons are free on Youtube and on her website. Follow the links into a world of learning and exploring Photoshop of all levels with such a wonderful teacher. She is your Mr. Miagi of Photoshop. To support her please visit her website and donate even if its just a dollar. A little bit goes a long way.
http://www.youtube.com/user/photoshopmama
http://www.shanzcan.com/ http://www.photoshopmama.net/?reload http://www.msdigphotography.com/index2.php
MY PHOTOSTREAM
Visit my continous stream of photos on flickr. I post new pix often. Feel free to give feedback and leave comments.
http://www.flickr.com/photos/fdpix/
http://www.flickr.com/photos/fdpix/
Free Photography Magazines
Here are two magazines that are free and their websites are just full of valuable stuff. Check them out.
http://www.rangefindermag.com/
http://www.aftercapture.com/
http://www.rangefindermag.com/
http://www.aftercapture.com/
SELL STOCK PHOTOGRAPHY
Ever wanted to get into stock Photography. This website links is a good place to start. You might make a living by selling those hoppy photos that are just sitting your hard drive. http://www.dphotojournal.com/sell-photos-online/
James Wei PhotoBlog is way cool
James Wei Photographyhttp://www.roentarre.com/ has one of the coolest Photo Blogs I've seen yet. He has such an interesting perspective on things and he shows you how to turn the most ordinary things to the most interesting. Check out his blog for some stellar images insight as he shares his passion for photography.
http://www.roentarre.com/Blog.aspx
http://www.roentarre.com/Blog.aspx
Subscribe to:
Posts (Atom)