Some cameras offer the ability to fire the flash at just before the second curtain closes. This is called rear (or second) curtain sync, and it is used to freeze motion at the end of the exposure. When making long exposures while firing a flash, rear curtain sync creates the effect of motion blur trailing the main subject.
In this photograph, the image is again lit by two sources, the ambient light of the club and the light of the flash. The difference is that in this photo, the flash was fired at the end of the exposure. Using 2nd (or rear) curtain sync this way causes the motion blur of your subject to appear behind the sharp area of the subject in the photograph and enhances the effect of the motion.
To sum it all up: front curtain = BAD rear curtain = GOOD. Ok, ok, that’s pushing it a bit, I know. I’ll say it this way: - Front Curtain flash = having a sharp subject then smugged over it by movement blur
- Rear Curtain flash = having blurry movement then with a sharp subject over it
One of the new features of the Pentax K5 is the ability to zero in on what ever you want to focus on in Live View Mode and the focus speed is lighting quick. This camera I'm sure will many more new secrets to reveal..
Tokyo, the 20th of September,
HOYA CORPORATION PENTAX Imaging Systems Division is pleased to announce the launch of the smc PENTAX-DA 18-135mm F3.5-5.6ED AL[IF] DC WR. Designed exclusively for use with PENTAX digital SLR cameras, this interchangeable standard zoom lens features a simplified weather-resistant construction and extra-smooth autofocus operation using a built-in motor, in addition to its high 7.5-times zoom ratio.
Tokyo, the 20th of September,
HOYA CORPORATION PENTAX Imaging Systems Division is pleased to announce the launch of the PENTAX K-5 lens-interchangeable digital SLR camera. Encased in a compact but solid, functional body, this new model comes equipped with a host of advanced photographic tools for the easy creation of diversified visual expressions, while demonstrating much higher standards of image quality, data processing speed and operability than previous models.
Developed using the highly acclaimed PENTAX K-7 (introduced to the market in June 2009) as its base, the K-5 inherits the exceptional reliability, user-friendly operation, array of advanced features and compact, lightweight body of its predecessor, yet it is more resourceful and flexible in photographic expression. Coupling a new high-speed, low-noise CMOS image sensor with the high-performance PRIME II imaging engine, it produces super-high-resolution, rich-gradation digital images with approximately 16.28 effective megapixels, even when shooting in the continuous shooting mode at a maximum speed of approximately seven images per second. It also offers an extra-wide sensitivity range between ISO 80 and ISO 51200 (when expanded via a custom function) and Full HD-proportion movie recording at 1920 x 1080 pixels to expand the boundaries of high-quality visual presentation. Adding other improvements and refinements — such as a much-faster autofocusing speed, an upgraded HDR (High Dynamic Range) function now usable in handheld shooting, and better operability through an overall review of the design and shape of all components — the K-5 is designed to be more functional and maneuverable in every detail, and more capable of responding to the discriminating demands of advanced amateurs than previous models. See more information about his camera and other Pentax Products at http://www.pentaximaging.com/slr/K-5/ This seems like its going to be a camera most Pentax users have been waiting for.
Some battery chargers are quite good at recovering a battery from a fairly deep discharge by using a pulsing phase cycle that dislodges sulphur build up on the plates but no charger can perform miracles. If your battery has been left to go completely flat then it will need replacing but don’t panic because they are not expensive. In the UK we have MDS battery and Battery Masters among the online traders that stock the most common sizes. In most cases a battery can be replaced without the need for elaborate tools. The battery connectors are usually the Lucar spade type and the leads simply push on to secure. A Broncolor Mobil pack has just four small cross head screws securing the cover to the battery carriage. Undo these and a battery swap can take less than a minute.
An SLA battery does not need to be periodically discharged in order to maintain it’s performance, in fact, it is best kept in a fully charged state. An SLA battery can be kept on charge indefinitely if a high tech charger, like the Ctek, is used. Cheap chargers have no monitoring and can overcharge and destroy a battery if the battery is left on charge for too long. Basic chargers also have poor voltage regulation leading to a shorter battery life.
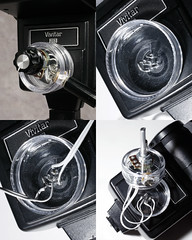
Adding a Power Control on your Vivitar 283 flash. This guy connected a potentiometer to the vivitar's plug. Seems very easy and a lot less work than other mods where you have open the flash to get to the thyristor and solder to the PC board.
In a parallel circuit, each component has its own direct path to both the negative (-) and positive (+) sides of the circuit. A simple schematic of a parallel circuit is shown below. In actually wiring the LED lights from Berkeley Point, as long as the red leads from the lights are connected to a wire that goes directly to the positive (+) side of the power supply and the black leads are connected to a wire that goes directly to the negative (-) side, you have wired the lights in parallel. If you follow the wire path back from a light to the power supply, it can "T" to other lights but should not go through any other lights. If your feed wire is similar to the Belden wires provided by Berkeley Point in so far as they consist of a red and black wire. In a parallel circuit, you will never have a black wire connected to a red wire (contrasted with example of series circuit shown above). Further, as long as you can follow a path from the red wire of a light back to the positive (+) side of the power supply through red wires and the same through black to the negative (-) side, you have wired in parallel. A group of many lights may have all their red leads connected together with one red (+) feed wire and all their black leads connected together with one black (-) feed wire.
What do professional photographers carry in their camera bags. Damon Webster finds out as he interviews them about their rig. One of the most informative photography channels on you tube. With plenty of variety of photographers that get interviewed each giving their own take on how they go about their photography. Watch Cool Videos about Equipment and the photographer who do the work.
A great way to increase color saturation is using LAB which extends the color space. It is the biggest color space. Its lke a box of crayons. SRGB is a small box. Adobe RGB is larger box. Well LAB is the huge mega box with every color imaginable. Increase the color space increases the color gradation and tonality to produce some really amazing effects.
A triptych is a panel of three images displayed together, but you don't always need three pictures to make one
When presenting your photos you will sometimes want to create and print them as a series of three images on a single sheet of paper rather than a single image. You might want to do this, for example, to use to decorate a gift card or for framing.
Here's a fun and easy tutorial on making your own HDR images by blending sevearl images in photoshop using masking. After posting Getting the Exposure Right, I received a quite a few questions about how I achieved the HDR (High Dynamic Range) version of the mailbox photo...http://photodoto.com/exposure-blending-tutorial/
ilt-Shift miniature faking is a creative technique whereby a photograph of a life-size location or object is manipulated to give an optical illusion of a photograph of a miniature scale model.
Altering the focus of the photography in Photoshop (or similar program) simulates the shallow depth of field normally encountered with macro lenses making the scene seem much smaller than it actually is.
In addition to focus manipulation, the tilt-shift photography effect is improved by increasing color saturation and contrast, to simulate the bright paint often found on scale models.
Most faked tilt-shift photographs are taken from a high angle to further simulate the effect of looking down on a miniature. The technique is particularly effective on buildings, cars, trains and people.
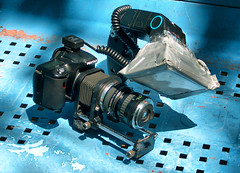
The 3D era is coming to movies and video--but it appears the world of still imagery won't be left behind. Stereography, in which two cameras take photos simulating the perspective of two human eyes, has been used to create 3D imagery since the 19th century. Russ Beinder spotted a more modern approach at the Olympics, with a photographer using two modern digital SLRs conjoined with a Sports Illustrated-labeled rig.
Check out this wonderful behind the scenes video by Pro Fashion Photographer Benjamin Kanarek on his blog here, whose images have graced the covers of Elle and Vogue from time to time. In this video, you see the creative ways Benjamin used hard flash light and mixed them with gelled H.M.I lights with a little shutter delay and some cool photo editing by Freddy Baby, Paris. Some reverse engineering on lighting inside.
First of all, we would like to thank Benjamin for sharing his techniques, though he didn't give details, the video speaks it all for any trained eye. Heres a breakdown for those who still couldn't figure out.
Take a good look at the video from the link provided to his blog above.
Target:
From what we see, the aim was to blend fashion with little bit motion and colors to show spring collection in an upmarket hi end style.
Team:
No matter how good the photographer is, the final image is only as good as the weakest link in the team. This video is perfect example of team work with everyone at their creative best. In one scene we see the stylist or MUA helping to set up the wind machine(fan). It helps to have people like this around to build a healthy creative atmosphere. Look at the model. She is the perfect example of what a model is required to do. With just the basic explanation of the theme, she just took off...and was spontaneous with her variety of poses. Hair was perfect to show motion, yet stylish. You see Benjamin directing the hair stylist in the beginning. And of course, since this blog gives equal importance to Photo Editing, there are some wonderful seamless retouching in there which just makes the picture and image.
Lighting:
To achieve this effect, Benjamin has used some H.M.I with magenta gels on them....i see around 2...to light the entire background....along with 2 flashes with magenta gels probably at low power.
The main light, is a hard light from flash with reflector, at a height higher than the models head and place at extreme right of camera for some shots and lon left for other shots. The light is high providing side light to the model and has a flag/cutter/gobo below it so that the light concentrates on face and mid body. Below the main light is another hardlight with a mixed pink and blue gel lighting the floor and feet area. You can see the nice contrast and the hard shadows this light creates.
Note the scrims and flags used to cahnnel the light and prevent the backlight from spilling on the model and to avoid flare in the lens.
Motion:
As you can see, there is motion blur in the model movements and dresses. A mix of techniques have been used here. Obviously....people are moving the cloth on behind....so that is one. This, and the model movements have been captured in camera by keeping a slow shutter speed, i guess either 1sec or little bit less than that. This also helps to balance the exposure between the H.M.I lights(which need longer exposure) and the flash lights. The motions have been more enhanced by the photo editing using blur techniques in various layers and blending them into one for the final image....along with some selective desaturation toning.
Please read the comments below where Benjamin fine tunes our reverse engineering with some facts.